Chicken Kebab

First of all – never listen to Foo Fighters when it’s cloudy outside and it’s probably going to rain.

That might develop some serious non-funky mood in you.

Been there, done that…

So, please, BEWARE!

As a remedy, I started to look for something extremely positive.

In fact, I didn’t have to go very far – I just opened a folder with some pics of the Chicken Kebab that I made yesterday.

Because I’m one of those funny people who cook and take pictures of their food.

And as if that wasn’t enough by itself, they post it on the internet afterward.

What are we like?’ – I ask.

Oh my….

Why do we do it?

Why do I do it?

And why does it make me so happy?

Anyway, as soon as I saw the kebabs, my mood was back to the funky mode again…

Because these kebabs are SO delicious and tasty and yummy and light and healthy and satisfying that they will make your head spin with joy…

Could it get any easier?

1. Cut the peppers into small cubes.

2. Cut the onion into halves – we will probably need one half only.

3. With the cut face down, cut the half into halves again.

Halves, halves, halves, halves.

Sorry, couldn’t help it.

4. Now rotate each half 90 degrees and slice it three times – you have onion cubes now.

5. Cut the chicken breasts into strips.

6. Now thread a pepper cube, an onion cube and then a chicken strip onto a skewer.

Repeat 3 or 4 times – depending on how long the skewer is.

7. Pour some vegetable oil into a larger pan and place it over medium heat.

8. Now place your kebab into the pan.

9. Sprinkle with some spice.

10. And fry for about 5-7 minutes.

11. Then turn the kebabs over and fry for another 5-7 minutes.

Yum!

I like to sprinkle them with a little soy sauce – that even adds to their already substantial ‘finger-licking-ness’.

(Of course, these can be grilled and enjoyed outside. That’s for sure.)

Enjoy, dear friends.

And don’t listen to Foo Fighters when there’s rain coming!

Love,

Petra

Contrast and Sharpening – These I Love Most…

I always let my pictures meet Photoshop – just because my pictures love it.

And who am I to say ‘no’ to them.

They totally love the welcoming and friendly attitude of  this wonderful piece of software.

And how it beautifies them.

They hug and kiss together and then I let them dance in a perfect and happy harmony.

Of all the procedures my pictures love and regularly enjoy, there are two that are their most favorite – increasing contrast and sharpening.

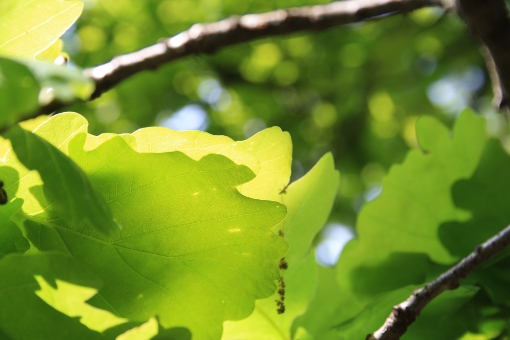
This is the original picture.

I took it last weekend when we (me and my boyfriend) visited one wonderful park in our neighborhood.

I was dazzled by the new-born green leaves that had transformed all nature into a huge energizing pool of pure vitality.

I stood under a tree and noticed how the sun shined through the leaves.

And that made me completely happy.

So I took the picture.

Of course, the story continued…

I opened the picture in Photoshop (not under the tree but when we came back home and I cleaned mud off my shoes).

Anyway, I decided to increase the contrast first.

That’s what I always do as the first thing – because that’s the most wonderful change to a picture I know.

If you’ve never increased the contrast on your photos, then please DO…

You’ll be amazed by how the gray, hazy film (that covers all straight-out-of-camera pictures) disappears in an instant.

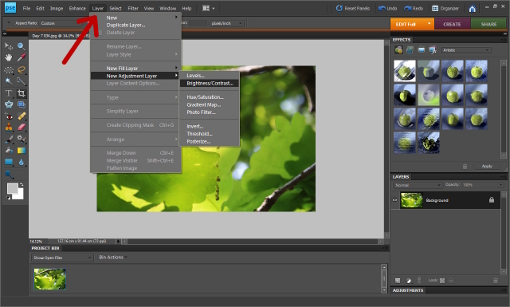
I clicked LAYER  >> NEW ADJUSTMENT LAYER  >> BRIGHTNESS/CONTRAST.

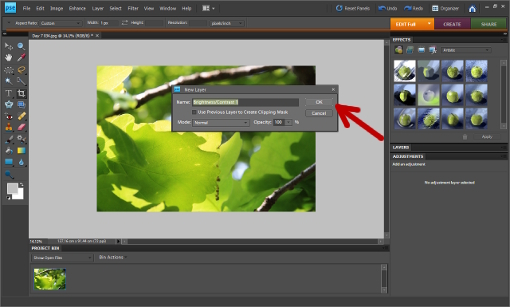
Then this window appears – there you click OK.

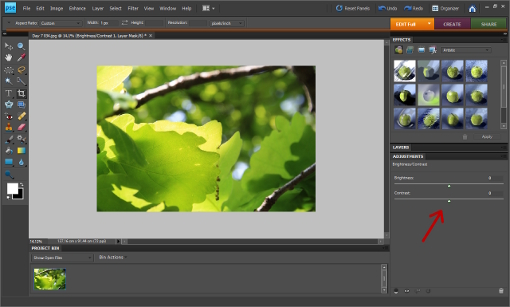
You’ll see two horizontal lines on the right panel now – so go ahead and play with the contrast to achieve the look you like best.

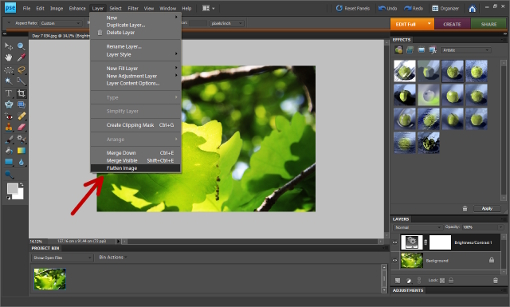
Then click LAYER  >>   FLATTEN IMAGE.

Now to the sharpening.

Things look better sharper – this is the basic truth.

Now you know it.

(Don’t thank me – send eggnog, please.)

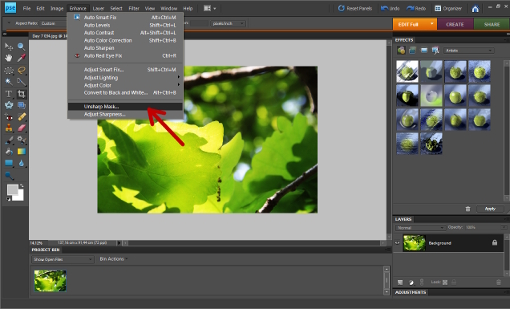
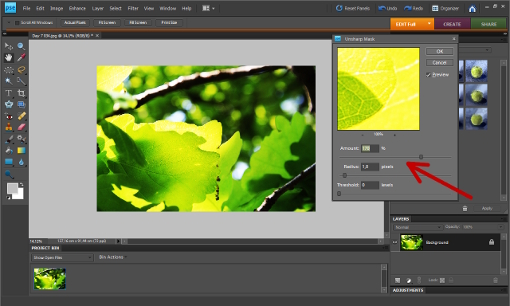
To make your images look sharper click ENHANCE >> UNSHARP MASK (yeah, you use unsharp mask for sharpening, isn’t that fun?).

Then again, play with the numbers to reach the result you find most appealing.

I opted for 170 in the amount window and 1.0 in the radius window.

Because I wanted to keep the picture rather dreamy, I felt no need to go overboard with the sharpness.

And that’s it!

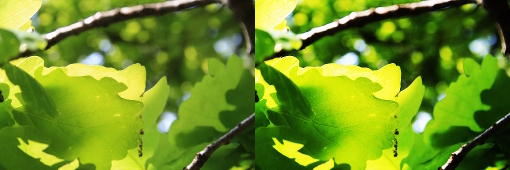
So again, this is the picture before…

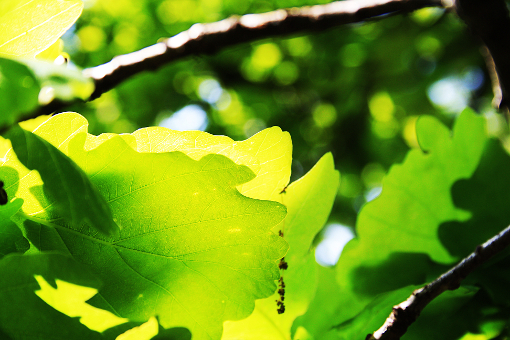
… and after.

I love how the veins of the leaf stand out now.

Oh, and the bokeh in the background – that always makes a photographer want to jump with joy.

Before and after.

Just try it, it’s easy.

(And if you don’t have Photoshop, don’t you worry for a second. Go and grab GIMP – it’s a freely distributed photo software and it’s gorgeous. And it’s free.  And have I mentioned it’s for free?)

Have a wonderful day.

Love,

Petra
Bookmark and Share

Send this to a friend