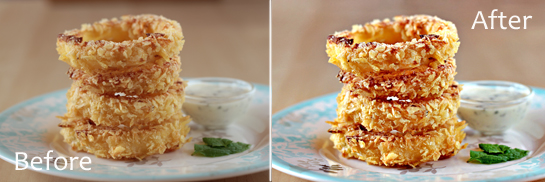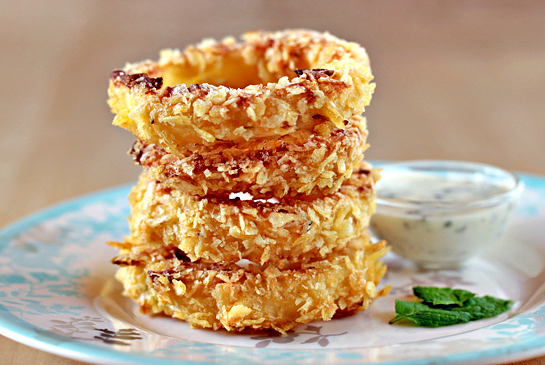
I’ve realized that although I have already posted a bunch of photo editing tutorials here before, I have never described my entire photo editing process – step by step.
And since many of you have asked about it, I’ve prepared this little post describing my usual workflow.
Some steps you may be familiar with, some steps may be new to you. Some steps might even look strange, especially if you are a trained photographer. Which I am not. But what I am offering here is the knowledge that I’ve gained during the last two years of my photography and blogging experience. So if you have anything to add, please do so in the comment section of this post.
Learning new things is good.
That is what I’ve heard some people saying so there’s probably something to it.

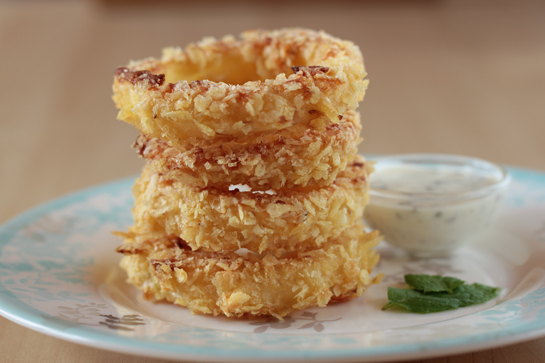
This is the original picture with no editing at all.
Lighting: natural (window light from left, homemade silver reflector from right)
This kind of setting usually works for me.
Camera: Canon EOS 550D
Lens: Tamron Macro 60mm, F2
Usual Camera and Lens Settings:
F-stop – f/4
Exposure time – 1/125 sec.
ISO speed – 100
Focal length – 60 mm
Exposure program – Aperture Priority
White balance – Auto

Editing software: Photoshop Elements 8
1. The first thing I do (after opening the picture in Photoshop) is cropping the image with Crop Tool for better composition.
Of course, this step is not always necessary. Sometimes, when I have a good day, I like the composition of the original picture.
2. Then I resize the picture (Image -> Resize). I always use 545 x 363 pixel dimensions. This is how my site is set. I use small images because I want the site to load as fast a possible.
3. Then I run the Boost Action from the Pioneer Woman Set of Actions for Photoshop Elements.
I love those actions very, very much.
4. Just recently I’ve found out that correcting exposure using a histogram is one of the best things in the world.
5. Then I sharpen the images a little.
6. After that, I usually boost the contrast with Unsharp Mask.
7. Finally, I like to lighten the shadows a little.
Usually, after taking these steps I am pretty pleased with what I see.
Or I am not. In such a case, I run to the kitchen, grab a chocolate bar to soothe my nerves, and start the process all over again with slightly different settings.
Also, you may think that this all looks like a very time consuming process. But I’d like to assure you that it is not. Once you get the knack of it, it can go really quickly. These days, it takes me about 1-2 minutes to edit one picture (key shortcuts come in handy – I will talk about that in the future too).
Okay then, I hope I’ve helped a little.
And again, please, if you have anything to add, leave us all a comment. We will appreciate it.
Thanks.
Love,
Petra
- Like
- Digg
- Del
- Tumblr
- VKontakte
- Buffer
- Love This
- Odnoklassniki
- Meneame
- Blogger
- Amazon
- Yahoo Mail
- Gmail
- AOL
- Newsvine
- HackerNews
- Evernote
- MySpace
- Mail.ru
- Viadeo
- Line
- Comments
- Yummly
- SMS
- Viber
- Telegram
- Subscribe
- Skype
- Facebook Messenger
- Kakao
- LiveJournal
- Yammer
- Edgar
- Fintel
- Mix
- Instapaper
- Copy Link

Thank you! I need to download/upload PW’s action sets but I tried with someone else’s and I could never find it on my computer once I downloaded it. Knowing her (cause we’re BFF’s and all), I bet her’s is more user-friendly. I really appreciate your simple step by step instructions.
Very interesting, thanks Petra 🙂
great info!
I just downloaded the PW’s actions and I’m in love with them! This info was so helpful – and there’s never a day where I don’t learn something new!
Ah, sofar, I’ve gotten good results with crop and levels… sometimes I will individually adjust the red or another channel… I think I also used curves once to over-cool the background on a very red food.
I relly love your blog! I think you’re so inspiring and I love the way you write.
Just wanted to tell you 🙂 Have a nice day!
Petra,
Love that you share your photo tips! One day in the future maybe I’ll be lucky enough to have a DSLR and be able to take photos that look half as good as yours. Thanks 🙂
Fantastic information, thank you!
“I run to the kitchen, grab a chocolate bar to soothe my nerves, and start the process all over again with slightly different settings.”
Oh, Petra, lol!
Wow, thank you so much for this! I’m not even sure how I stumbled upon your blog, but I love it. I’m new to photography and your tutorials have helped out a lot.
Who knew the unsharp mask could actually make your pictures sharper? (probably everyone but me) Just that action alone has helped my pictures look soo much better!