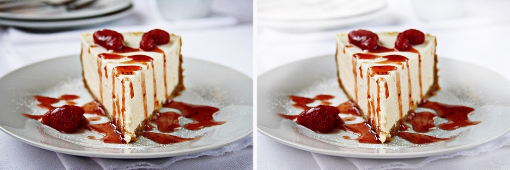
This is a transition I’ve been really fascinated by lately.
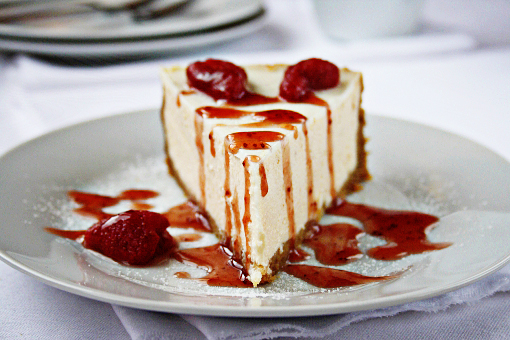
The original picture of New York Cheesecake was nice but I thought it could really use some more lightness and focus on the delicious cake.
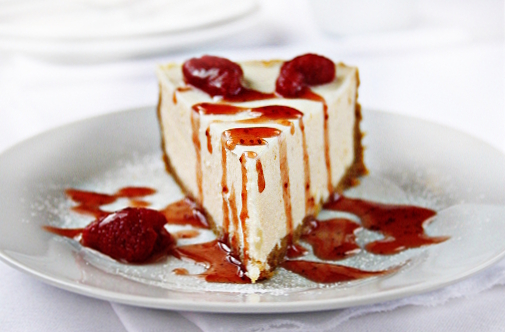
And here it is again, after the transition.
The background is brighter, a bit more blurry and romantic.
It feels kind of happy and ethereal.
If you’d like to have a look at how the process goes then I’ve prepared this cute little tutorial just for you.
Note: I am using Photoshop Elements 8 in this tutorial.
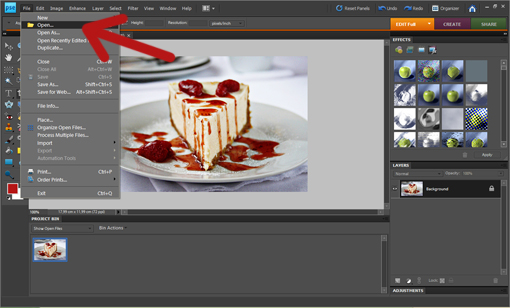
1. Open the picture you want to adjust.
Go FILE >> OPEN.
Now find out what’s the size of the picture – go up to the Image menu at the top of the screen and choose Resize – Image Size from the list of options, which will bring up Photoshop’s Image Size dialog box. We need to learn what the ‘Pixel Dimensions’ are. Then close the box.
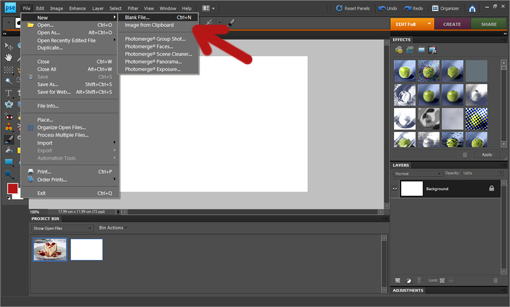
2. Open a new blank (white) file with the same dimensions as the former picture.
Go FILE >> NEW >> BLANK FILE.
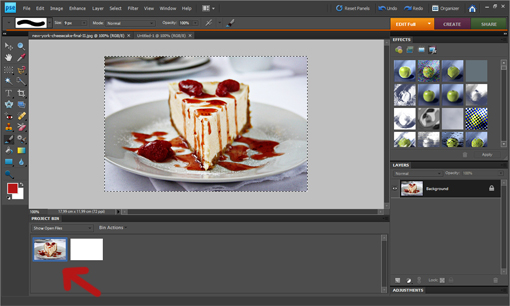
3. Now we are going to copy the first picture.
Double click on the first picture and then CTRL+A >> CTRL+C.
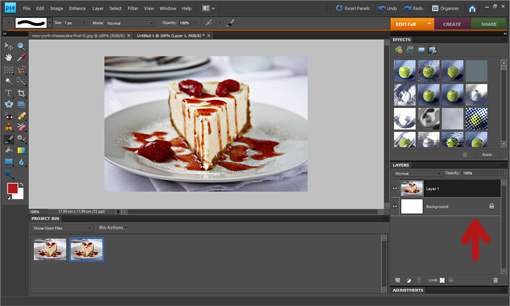
4. Next paste the copied picture into the blank file.
To do that double click on the second (blank picture) and then CTRL+V.
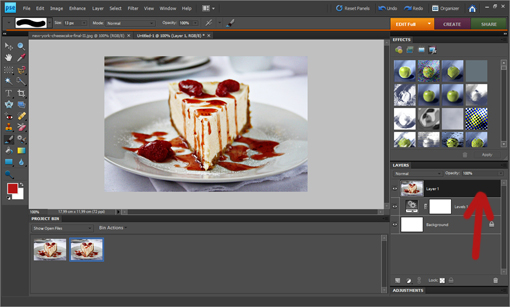
In the layers palette (where the arrow is pointing to) we have now two layers open – they are two layers of one picture.
What we do next is kinda ‘rub off’ bits of the top layer so that the bottom (white) layer will be slightly seen.
That’s the mighty trick!
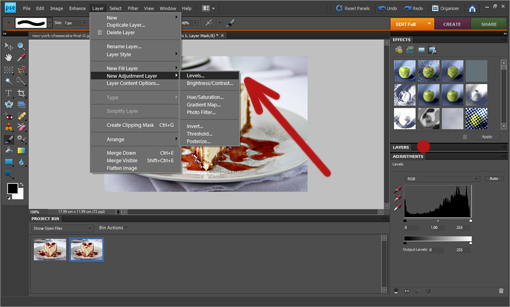
5. For the above mentioned purposes we could really use something called a MASK.
For those of you who use ‘full’ Adobe Photoshop just click MASK.
And you, ELEMENTS users, don’t get scared – on one hand, it is true that Photoshop Elements doesn’t have the MASK, but we are smarter than that. Because we can CHEAT!
But pssst, don’t tell anyone!
Click LAYER >> NEW ADJUSTMENT LAYER >> LEVELS.
Then, on the right-side panel (layers palette), click LAYERS back.
6. Now we need to get the layer which is in the middle position up to the top position.
Drag the middle layer one layer up (so that now we have the layer with the picture we want to improve in the top position).
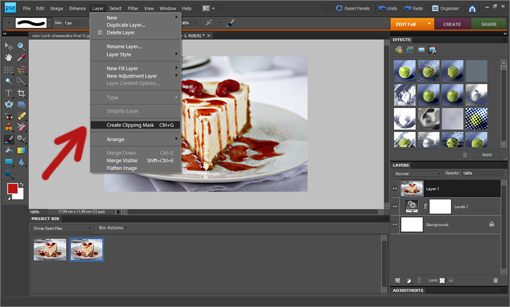
7. We want the top two layers to marry each other now and function together in perfect harmony.
To achieve that (with the top layer clicked) click LAYER >> CREATE CLIPPING MASK.
And let the fun begin!
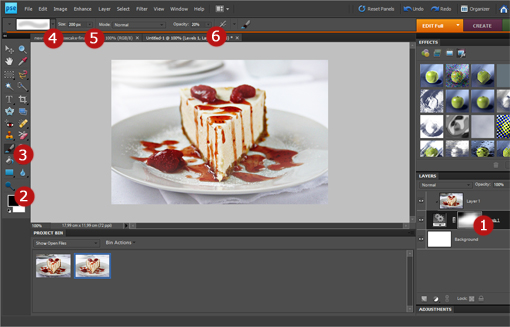
8. The red dots represent things you should adjust or have a look at before you start painting.
- Click on the white thumbnail in the middle layer (this is really crucial).
- Have the foreground color set as black (click ‘D’ key to achieve that).
- Click on the brush tool.
- From the set of basic brushes choose from the fuzzy ones (I chose 300).
- Adjust the size so that it works for your picture.
- Adjust the opacity to about 20%.
9. Now you can start painting over the picture – the areas you paint should become slightly whiter.
If something goes wrong, please, check the above 6 points again.
10. Finally, when you’re happy with the result, click LAYER >> FLATTEN and then FILE >> SAVE.

All right. By now you might be asking why you can’t create the white misty background in a simpler way – by painting the background white using a brush tool having the opacity reduced slightly or by using a dodge tool. Of course, that can be done, though it is not advised. Mostly because if you are not happy with the changes you’ve made to the picture, all you can do is click UNDO. And that is not very smart.
With this method, if you wish to go back and do something differently, just click the letter X on your keyboard which will switch the foreground color to white. Then continue painting over the picture and you’ll be able to see how your previous changes are being undone and you are getting back to the original picture.
Enjoy, dear friends.
Love,
Petra
- Like
- Digg
- Del
- Tumblr
- VKontakte
- Buffer
- Love This
- Odnoklassniki
- Meneame
- Blogger
- Amazon
- Yahoo Mail
- Gmail
- AOL
- Newsvine
- HackerNews
- Evernote
- MySpace
- Mail.ru
- Viadeo
- Line
- Comments
- Yummly
- SMS
- Viber
- Telegram
- Subscribe
- Skype
- Facebook Messenger
- Kakao
- LiveJournal
- Yammer
- Edgar
- Fintel
- Mix
- Instapaper
- Copy Link

