Aaaand I Did It Again (… Painting Furniture With Chalk Paint)

painting furniture with chalk paint

Hi friends!

Yes, my project of pouring more color into our home continues. And, as promised, I did it again – I could not resist and gave the chalk paint another job to do. This time, I laid my eyes on the TV unit in our living room.


painting furniture with chalk paint

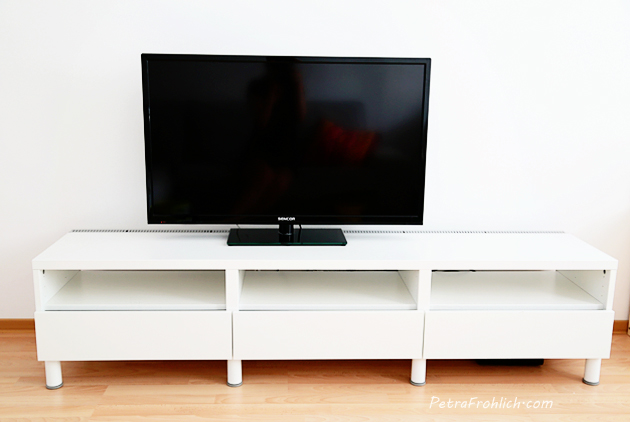
This is what the TV unit looked like originally. It is Ikea’s BESTÅ.


painting furniture with chalk paint

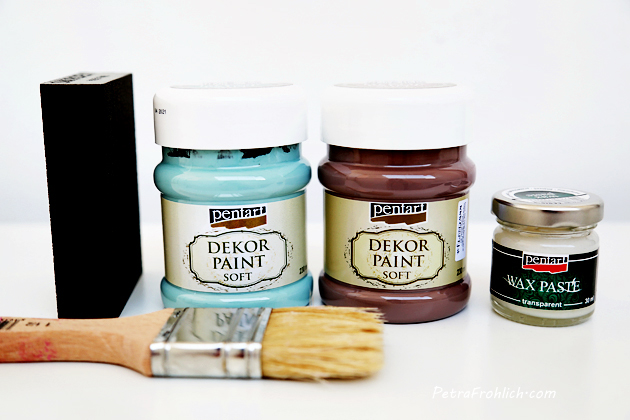
Here’s what I used: one 230-ml jar of country blue Dekor Paint Soft (chalk paint) from Paintart, two 230-ml jars of vintage brown Dekor Paint Soft (chalk paint) from Pentart, a brush, a fine sanding block and finally, after some reconsideration, I replaced the wax (shown in the picture) and decided to give varnish one more try (I was a little hesitant after my not so happy experience from the previous project, where the varnish contained lumps and I did not really know what I should think about that). The new varnish I used was a transparent matte acrylic varnish for wood called Sportakryl from Balakryl and it worked like a charm, phewww.


painting furniture with chalk paint

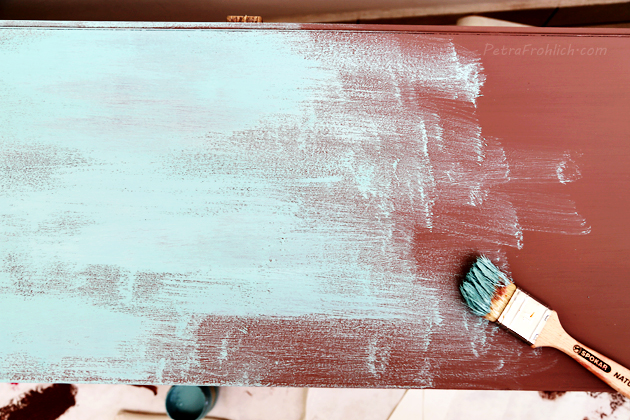
As in my previous chalk paint project, I went for this fun shabby look, where you first paint your furniture one color (I first applied two layers of brown) and then paint with a different color (I used one layer of country blue).


painting furniture with chalk paint

When all paint is nice and dry, you then use a fine sanding block to distress the top coat of paint here and there, mostly on the edges where the natural wear would appear.


painting furniture with chalk paint

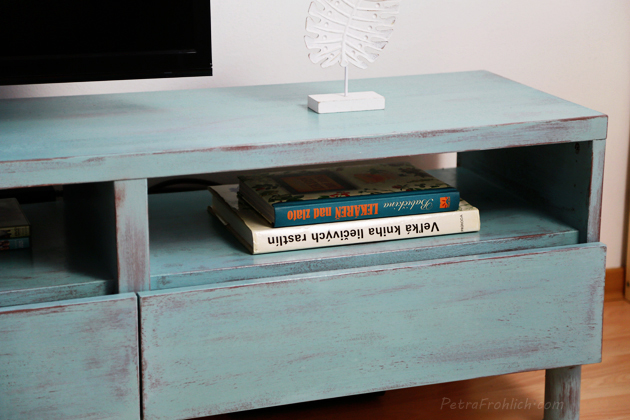
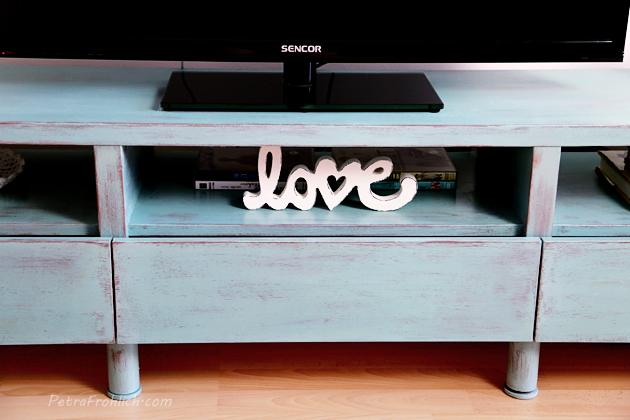
Finally a layer of varnish is applied and that’s it. So easy. So much fun.


painting furniture with chalk paint

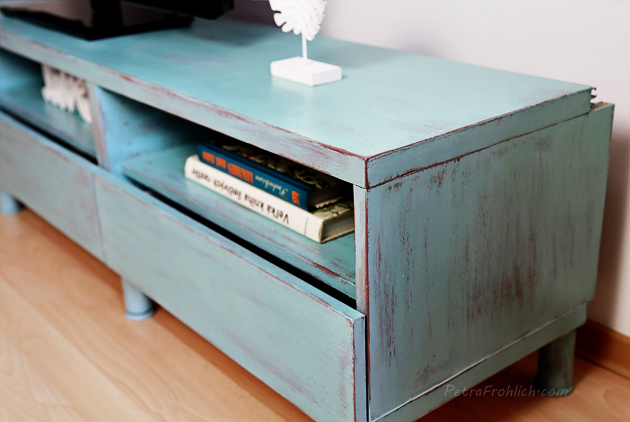
Although I am aware that this look might not be for everyone, I just can’t get enough of it. For me, it produces very unique pieces of furniture that look straight out of a fairy tale. Love it so much!

Thanks for letting me share.

With love,

Petra xoxo


How To Make A Simple Round Crochet Rug

round crochet cushion tutorial

Hi friends!

In the past few months I’ve been really eager to pour more color into the place where I live. Just for fun. To make us feel better. And while doing that I learned one big thing about me – I can find a good excuse to use PINK in every project, for every room (I honestly did not know that about myself, but now I do…) 🙂

With this and this happy project under my belt, I am super-excited to share with you another thing I made, my newest darling, the crochet round rug.

And it’s pink. Yes. What else is new, you might ask. 🙂

Anyways, I had been planning to make a big area rug for quite some time. The only thing that was holding me back was the fact that I did not really know how to prevent the rug from slipping (with a little baby in the house, that was my top priority).


how to make a round crochet rug

This issue was miraculously solved one day when I stumbled upon this Ikea product. The Stopp unti-slip underlay keeps the rug in place, which reduces the risk of slipping and makes it easier to vacuum. Awesome, huh?


how to make a round crochet rug

If you’d like to make something similar, I am happy to describe for you what I did:

I used bulky yarn (this, this, this and this) and 6 mm crochet hook (J-10).

PATTERN

In Round 1, I made a magic ring and crocheted 13 double crochet stitches into it.

Note: If you’d like to make your rug with single crochet stitches (US), starting with 6-8 stitches is recommended in round 1.

If you’d like to make make your rug with half double crochet stitches (US), 10 stitches are recommended.

Round 2: Make two stitches into each stitch of Round 1.
Round 3: Make two stitches into the first stitch of the previous round, one stitch into the next. Repeat this pattern.
Round 4: Make two stitches into the first stitch of the previous round, then one stitch into the next two stitches. Repeat all the way around.
Round 5: Make two stitches into the first stitch, then one stitch into the next three stitches. Repeat this pattern all the way around.

You now see a pattern emerging. In every round, the number of stitches between increases increases by one. To continue making your rug, increase the number of stitches between increases by one.

My rug has 53 rounds. And then the scalloped edging as Round 54.

Tip: If your rug starts to WAVE, that means you have too many stitches in the last round. To help that, make one round without any increases.

If your rug starts to look like a BOWL, that means that the number of stitches in the last round is too little. To help that, make one round with double the amount of increases.

Edging:

I ended my round 53 with 570 stitches (I think I officially ended with 571 stitches but since I needed to have a number of stitches which would be dividable by 6 to make the edging work, in round 53 I ‘got rid’ of 1 stitch by making 1 dc decrease in two last stitches. It is not noticeable at all).

To make the edging I made this: ‘6 double crochet stitches – chain 1 – skip 2 stitches – 1 slip stitch in following stitch – chain 1 – skip 2 stitches’ and then continued repeating it all the way round.

And that pretty much concludes how the rug was made.


how to make a round crochet rug

And here it is in full action.

The round rug currently resides in our living room, serving mostly as playing headquarters.


how to make a round crochet rug

After sewing the unti-slip underlay to the underside of the rug, it works just like a charm.

Thanks for letting me share.

See ya!

With love,

Petra


Send this to a friend