It’s nearly winter.
If you take photographs (and especially if you take photographs inside your home) then you’re surely familiar with what winter time means to a photographer.
Short days and poor light.
Right?
Right.
“But what are we going to do?”
“WE ARE GOING TO FIGHT IT?”
“And what else are we going to do?”
“WE ARE GOING TO HAVE MORE MARS BARS THAN USUAL.”
Well, that was my inner motivational trainer talking to the evil part of me that likes to solve all problems with bars of chocolate. They clash, those two, quite often.
Anyhow, as a food blogger, I am currently solving just that problem – how to achieve a better looking light in my pictures.
But you know what?
I have found out that sometimes it might be good to face an obstacle. Because facing an obstacle might lead you to learning new things. Like finding out what a histogram is. And finding out about its magical powers.
Because that strange looking and strange sounding histogram is in fact a dear friend.
Just let me show you…
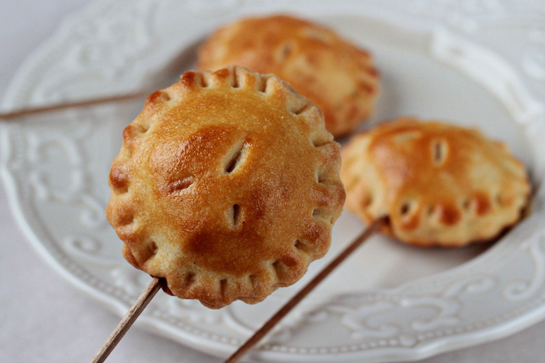
Here’s a picture that I took just recently.
It could definitely use more light.
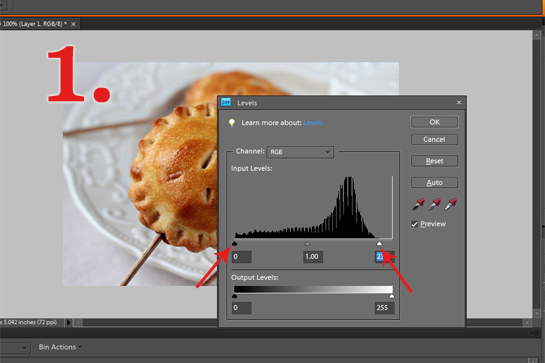
So I opened it in Photoshop Elements.
After that, I opened a new layer: Ctrl+J (or Command+J for Mac).
And then I used a magical spell to bring histogram to life, which is nothing else but: Ctrl+L (or Command+L for Mac).
A window with histogram appeared.
I was on a good way.
1. First, I moved the left and right triangles towards the center to where the bulk of the black starts. That brought more light, definitely. It also added more contrast (I once wrote a larger post about this – you can see it here).
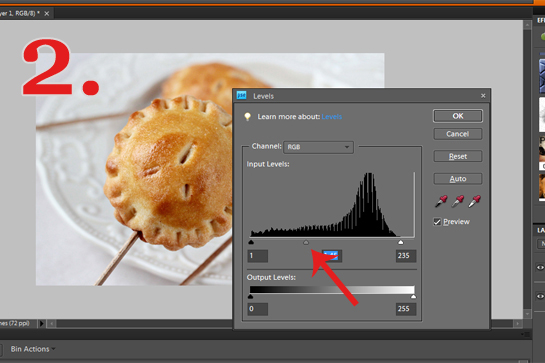
2. And then, I moved the middle triangle to the left, just until I found the result pretty and light enough.
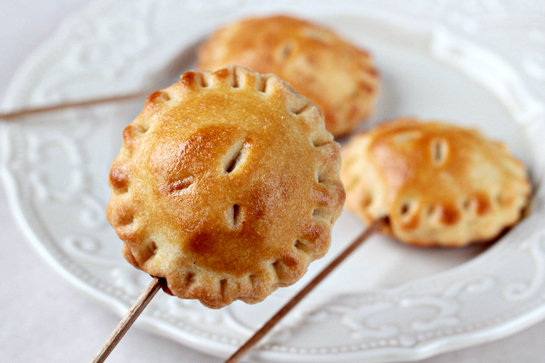
And I achieved this.
The picture seemed to have lost a little contrast, so I improved it with this wonderful technique.
Then I merged the layers (Ctrl+Shift+E or Command+Shift+E for Mac) and saved my picture (Ctrl+Shift+S or Command+Shift+S for Mac).

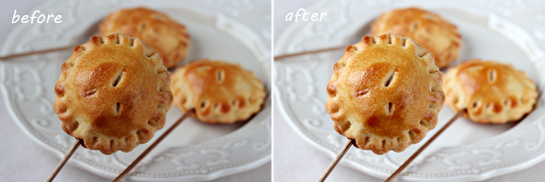
Before and after, side by side for you to compare the effect.
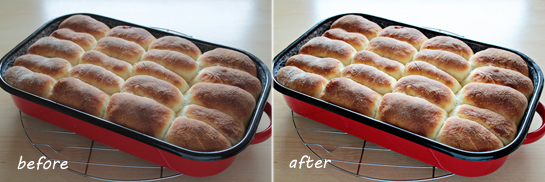
The same process with jam buns.

And the very same thing with chocolate mug cake.
So, this is what I do with every single picture that I take these days. The results make me so, so, so happy each and every time.
There are other ways how to lighten up images though. Which ones do you use? Feel free to share…
With lots of love,
Petra, The Light Seeker
- Like
- Digg
- Del
- Tumblr
- VKontakte
- Buffer
- Love This
- Odnoklassniki
- Meneame
- Blogger
- Amazon
- Yahoo Mail
- Gmail
- AOL
- Newsvine
- HackerNews
- Evernote
- MySpace
- Mail.ru
- Viadeo
- Line
- Comments
- Yummly
- SMS
- Viber
- Telegram
- Subscribe
- Skype
- Facebook Messenger
- Kakao
- LiveJournal
- Yammer
- Edgar
- Fintel
- Mix
- Instapaper
- Copy Link

Oh how I need all the tutorials on the planet for good exposure. A my pictures at Food Gawker are getting rejected due to low lighting & underexposure. I definitely have to try this.
Hi Petra,
I usually don’t leave comments, but I LOVE reading your blog! Thanks for the wonderful recipes and photography tips that you share (and I love the touch of humor that you add in each post)!
One of your loyal readers,
Rosa
What a great post! I totally know what winter means – low lighting! It’s so frustrating sometimes. I even have a ego light but it’s just not enough! Editing definitely helps. I had a trial version of lightroom but now that the trial is over I will need to use the elements I have. Thanks for the tip!
Thank you soooo much for sharing. I’ve definitely been having lighting problems this winter – both because it gets dark too early and because the sun isn’t as bright as it was over the summer. I appreciate your mini tutorial. Thanks!
Well done. With the sun going down at 5 PM now it is great to be reminded of ways to add light to photos when there is little to be had! Keep seeking the light.
Thanks for the tips!! I am constantly battling for more light in my apartment. I can’t wait to try this out. Hopefully I won’t have to resort to making dinner at 11am in order to get a decent picture anymore!
Petra, I certainly enjoyed your post and learning something new about Photoshop (I have used PS in the past but it has been so long and alas I do not take pictures as often as I once did) but I was wondering what kind of food was pictured in your first photo?
Hi Joy!
It’s pie pops. You can find the recipe here: https://zoomyummy.com/2011/11/23/pie-pops/.
Petra 🙂
Brilliant, simple technique that is clearly effective – thanks so much! I’m a total luddite when it comes to using Photoshop, and my camera is a (good but basic) point and shoot rather than SLR so my blogging has all but ground to a halt thanks to the winter evenings – will try your technique and see if I can rescue some dark pics!
I use picnik’s tools sometimes for lighting fixes and it is SO user friendly!!! =)
Hi there!
I just found your blog via Stumble and want to say THANK YOU for your wonderful photo tutorials. I am completely self taught DSLR user and Photoshop Elements user and I have been reading and pinning your tips for the past hour. Adding you to my reader now so I can follow along. (I’ve also always wanted to learn crochet!)
I loved reading your post, but somehow I’m still not convinced that photoshop or any other software alone can solve the light problem. This winter is gonna be my first winter in exploring artificial lighting or strobe lights….I’m dreading the fact that Mr Sun is just not gonna show mercy on me as I love taking food photographs in natural light. Thanks!
Hi
OMG, I love, love,love your bolg. I am so glad i found it, we seem to have a lot of things in similar. i love photography and cooking. And I love you sense of humor, you my kind of girl. Anyway thanks for the post, I am still growing and learning with photography and my birthday is coming up on the 5th of November and after much *ball polishing* ( omg did I say that) my hubby is going to buy me a new Canon 550d, my old camera got lost at the airport, soooo looking forward to clicking away.
Have a request, can you do a full tutorial on photoshoping, I really need some help with my editing. Thank you in advance.